Paper Quilling (also known as Paper Filigree) is a wonderful art form where thin strips of colored papers are rolled/coiled, then shaped to form splendid designs. Quilling has it’s roots back in fifteenth or sixteenth century and it is often said that the nuns and monks at that time used this method to make religious artifacts using handmade paper or edges trimmed from the books. In olden days, the designs created often represented some Iron works or metal filigrees (Designs made using metal wires).
Since then, paper quilling has come a long way, also took a lot of transformations making the quilled designs more complex and elegant on it’s way. Early quillers had to make their paper strips and tools from scratch unlike nowadays, where one can get all type of tools and materials needed for quilling easily from a craft store. It is said that the early quillers used some quills from certain animals/birds to roll and coil the paper strips, hence the name Quilling. Okay enough about the history! Let’s start with the quilling already.
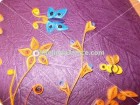
Sample Quilling works:


You would have seen this type of work on some of the paper bags, or on gift packs. Hard to believe everything from flowers to bird are made from just paper strips right?
Let us see how we can make this from scratch and also see about the tools required to do this.
Tools required:
1. Paper Strips (standard quilling paper strips of 3mm or 4mm size); Lots and lots of it in variety of colors.


2. Quilling tool to roll the paper strips; Optionally you can use tooth picks instead of this tool that’s in case if you want to start quilling right away.

3. Glue
4. Handmade paper or chart or even cardboard to paste these quilled works
5. Quilling board or guide board to make uniform coils (optional).
6. Scissors
7. Needle
8.Tweezers
Note:
All of the above items can be purchased from a craft store. In case if you want to practice quilling before buying anything, then you can tear few unused pages from your kid’s colored drawing books or from old scrapbooks and then cut thin strips from it. (That’s how I practiced it!)
How to do Quilling?
1. Quilling tool looks like a pen with a slotted blunt needle at the tip. Take one paper strip and insert one end of the strip into the slot and fold; then start rolling the tool with one hand while holding the other end of the strip on the other hand. Roll it gently; Neither too tight, nor too loose.

2. After rolling enough strip, gently remove the coiled strip from the tool and release the coil to some extent. Apply glue at the end. This is the basic shape for any quilling design from which other shapes can be made by shaping this circle.


If you are making flower petals, then it is important for the petals to be of uniform in size. For that purpose, you can use quilling board. I’m using my drill gauge since I don’t have one. You can also make one with a help of cardboard my making different sized holes on it and covering the cardboard’s back with a paper.

3. Now it’s time to make shapes from the above coiled strip. Take one circle from above and holding that in between your fingers, apply pressure and slightly pinch at one point to make a sharp tip. This will look like a tear drop shape. Similarly, we can shape the coils by applying pressure at various places to form different shapes.
Note: After making the required shape especially using loose coils, use a needle or a tweezers to adjust the different layers in order to make them evenly spaced.


Depending upon the shape, these quilled shapes are called, tear drop, eye, leaf, half circle, arrow, heart, tight coil, loose coil etc. Try practicing more, and make more and more new shapes.
How to make a flower?
1. Make 5 tight coils of same color and 1 small coil of different color. These six coils will make a flower. For 2 leaves make 2 loose colis of different color. With these coils, we are going to make few flowers.

Arrange these coils in a circular manner and paste them on the chart or cardboard.

For the leaves, pinch the loose coils at the ends to form two tear drops.


Add a stem to get a nice look.

Now convert these coils(petals) to tear drops to get a different effect.

Invert these tear drops so that the sharp tips are facing towards the center of the flower. There’s your new flower.

Now convert these petals to eye shape by applying pressure at both the ends to get a different flower!

To make tulip(?) flower, try the following!

As you can see, the above pictures hardly need any explanation right? How simple is that?
That’s it! using your imagination and of-course your patience, you can make beautiful quilled designs in no time.