This is the continuation of my previous post “Paper Quilling – Flowers – Part 1!” which explains the basics of paper quilling. If you are new to this quilling, I suggest you read my earlier post.
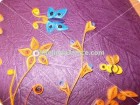
Paper quilling is gaining more popularity nowadays and throughout the world, more and more people are taking this art form seriously for their carrier and hobby. Quilled designs can be used as a decoration in greeting cards, invitation cards, wall hangings, gift wraps, special gift boxes, paper boxes, photo frames, or in jewelry.
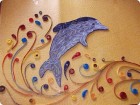
One of my quilled wall decor describing dolphin jumping!

Instructions:
First draw the outline of your favorite drawing on a chart or cardboard.

Start making several quilled shapes using quilling paper strips.

Apply glue on the drawing and start pasting these quilled shapes slowly and gently.

Fill up the space with appropriate shape and color.

Once when all the gaps are filled, take one paper strip and paste it on the outline, containing all the quilled shaped inside the drawing.


Make more open coils for waves and water as in the picture below.

Quilling in decoration:

Wrap the gift box with a bright colored paper or a gift wrap. Make a few arrow like shapes for making flowers. Apply glue and paste these flowers on the box. Add the stems and branches wherever it is necessary.


Quilled designs can be used as bookmarks for kids story books.

Jewelry from these quilled works!


All the works done by you are very nice and mind catching. The presentation of pictures and way of telling – how to do- also fine and easy to understand. My best wishes for your future projects.