Basket weaving using Palm leaves is a long kept tradition in my place, i.e. Tamil Nadu, a southern part of India. These baskets are used as storage containers, toys or as home decors . I remember making few tiny palm baskets myself when I was a little kid with the help of my grandma and my aunt. From then on I’m totally obsessed with these palm products. They come in different shapes, sizes and colors according to the needs. Some of my collections over the years are shown in the picture.

keeping these palm baskets as an inspiration and model, I’ve made three baskets using paper strips. Lets have a look at these baskets.
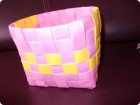
Basket #1:Made from Chart Paper

Basket #2: Made from Textured Hand-made Paper

Basket #3: Made from Textured Hand-made Paper

First basket is made from simple chart paper using a straight-weaving method. For the second basket, I’ve used a textured hand-made paper using the same method as the first basket. Third basket is made from the same textured hand-made paper using both straight-weave as well as cross-weave method.
For this post, first let us start with the basket #1.
Materials List:
1. Chart Paper – 2 colors

2. Glue
3. Scissors
Instructions:
1. Cut thin strips of chart paper approximately 1 inch in width. You need 12 such strips, 6 in each color i.e only for the base of the basket. Fold these strips into half along its length.
I’m folding these strips, because I want the basket to be little rigid. It’s up to you whether to fold these 1 inch strips or to just use 1/2 inch strips like I’ve done it in the Basket #3. Increase or decrease the number of strips according to the size of the basket you want to weave.

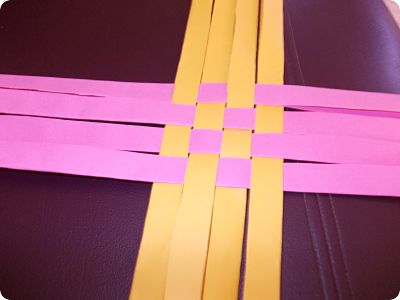
2. Arrange 6 paper strips on your workbench vertically and take one free paper strip and weave it through the 6 strips on the workbench. Weave this strip over the first strip, then under the next strip and again over the next strip. Follow this pattern of over-under-over-under…. until you finish all the strips on the workbench.
For the next row, follow the reverse pattern of the previous row i.e here in this case “under-over-under-over….” just like in the picture. Similarly add as many paper strips as you wish. The more you add, the bigger will be your basket.


3. Now after adding 12 strips, your basket’s base is ready. We need to cut few extra strips say in my case it is, 6 more strips in order to give the basket some height. To facilitate easy weaving, fold the alternate strips inside the basket as shown below.

4. Now take one paper strip (out of 6) and place it vertically in between the woven strips just like I did it in the picture below. From now on I’ll call this new strip as a Running strip. So you will be having 6 running strips in total.

5. Start weaving from left to right i.e bring the inner strip to outside and outer one to inside by crossing over the running strip. Repeat this for all the base strips by keeping the running strip intact. When you have come to the starting point, apply little glue on the running strip and paste it with its other end i.e starting point. Trim the extra paper at the end of the running strip. Now you must have completed one row.

Similarly add the next running strip(2/6) and complete the second row.


Do the same with the rest of the four running strips.


6. After adding all the six paper strips, you can either apply glue and paste the ends or you can tug the strips inside or outside as I’ve done in the picture below. Trim the extra paper at the ends. Do whatever you feel comfortable; since it’s a paper basket, either way works very well.

With this your basket #1 is complete and you are ready to go.

I’ve found one good use for my basket. …


My daughter’s idea! 🙂

Instructions for weaving Basket #2:
This basket is woven exactly like the first basket, except that I’ve used a textured paper instead of chart paper.


After adding all the strips, trim the ends and paste them at the top. Now for the smooth edge, paste one paper strip at the top like in the picture below.


I’ve made a cover for this basket!


Instructions for weaving Basket #3:
For the base you follow the same method as the previous two baskets.

For the cross-weaving, there won’t be any running paper strips as it is in straight-weave. We will be using the same strips that are used to weave the base of this basket.
First thing you have to do is to form the four corners. For that take the two center strips on each side and start weaving upwards diagonally along with the other strips on that side. Hence the two center strips on one side will become the corner for that side after woven together.
Complete one side at a time and it will be like a diamond on one side. After finishing all the sides, separately join all the sides i.e diamonds together.

This method is very easy and you can finish the basket sooner than in the straight-weave method.
Try it friends! Have lots of fun with paper crafts!
Paper baskets are awesome….especially the last one 🙂
Awesome..:)