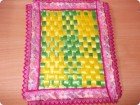
As it name depicts, a mat tape can be very well used to weave beautiful mats. The method which I’m going to do today is very traditional and it is been in practice for many many years now. My version of a simple mat using the traditional mat weaving is shown below.

Materials needed:
1. Mat Tape or Fish Tape

2. Hot Glue
3. Lace for decoration
Instructions:
1. Measure and cut a length of 1ft mat tape . For the above mat, I’ve chosen two different colors of green and yellow. You will need 16 numbers of 1ft tape in each color.

2. Arrange 16 tapes on your workbench like in the picture. If you want, you can use a tape to seal the tapes on the workbench to make them stay at one place. Now you will be left with 16 more free tapes.

3. Take one tape at a time and weave it through the 16 tapes that are neatly arranged on the workbench. Starting from the left side, first weave one tape under the first tape, then over the second tape and again, under the third tape. You have to follow the pattern ” under-over-under-over-under……” until you come to the last tape. Apply hot glue at the starting and at the finishing points in order to hold these nylon tapes tightly in position.

4. Likewise take another tape and weave it through these 16 tapes on the workbench just above the one you just weaved. Now you have to follow the pattern “over-under-over-under…..” (opposite of previous one) until you finish all the 16 tapes. Apply glue at the ends.

5. In the same way, weave all the free tapes on to this mat, one above the other.

6. After applying hot glue at all the ends, either you trim the extra tapes or fold and apply more glue at the back. For perfect finishing, stitch a fabric cloth(same size as the mat or little smaller) at the back for smoother finish. It will hide all the unwanted glues and stuffs and the mat will also last for longer time. For the final touch, paste a nice looking lace around the mat just like the one I used.

7. OR you can go one step ahead and paste a few flowers made from the satin ribbon at all four corners…..like in the picture below.


As you can see, this is very simple and a useful project. Kids will surely love it. 🙂
Note: Increase/decrease the length of the tapes, number of tapes and the color of the tapes according to your needs and your wish as this is a sample representation. Again, if you can’t get any of these mat tapes or fish tapes, you can very well try this with paper strips or thin cardboard strips.


Comments are closed.