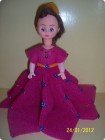
This post is an extension of my previous post i.e “Memories from the past: Dressing up a Doll using Foam Sheets! – Part 1“. Here I’m going to explain a different method to dress up your doll using foam sheets. Lets have a look at the doll before and after adding the foam dress.

Doll

Doll with Foam Dress
Now lets see how it is done in few easy steps:
Materials needed:
- Doll, any size of your preference.
- Foam Sheets color of your choice.
- Chamki or colorful beads or any glittery things like stones for decorating the dress.
- Fabric Glue and pins.
- Thin Cardboard.
- Satin Ribbon.
- Needle, Thread, Stapler and Scissor.
Steps:
1. Hold the doll in the upright position and measure the height from it’s hip to toe. Lets say the hip to toe height is 4 inches.
2. Cut out a Trapezoid(or somewhat similar) shaped piece from the thin cardboard with the height equal to the doll’s hip to toe measurement. This is going to be the skirt for the doll. When you roll it horizontally, it will become a cone shaped structure as shown in the figure.

Cardboard

Cone
3. Unroll it and place on top of the foam sheet. Cut out the same shape from the foam sheet.

Foam Cutout
4. Now paste together both the cardboard and foam cutout by keeping foam on the top. If paste doesn’t work for you, then staple it.

Foam and cardboard
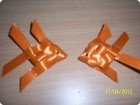
5. Cut few strips of foam sheets.(1.5 inches wide approx.)

6. Now cover and stitch the bottom edge of these strips with a satin ribbon to form a piping. See the figure below.

Satin Piping

Satin Lining
7. Place one of the above strip at the bottom of the foam-cardboard base. Then now make small uniform frills on the strips and stitch or staple it on the foam-cardboard base. Make one frill at a time and staple/stitch it before going make to another.

Frills

Frills Completed
8. Add 3 more of these rows, one above the other like in the following figures.

Frills 2 Rows

Frills 4 Rows Completed
9. Now hold the doll in the upright position, roll the above frilled foam-cardboard around the doll’s hip and fasten it using a string or a pin. Make sure that it stays firm on the hip.

Doll Skirt
10. For the tops/shirt, follow the steps from 9 though 11 from my previous post.

Doll Tops

Doll Tops
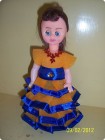
11. Finally for the decoration, I’ve added few stones on tops to make the doll look cute.

Tops with Stones

Finished Doll
Note: This is not a toy for kids. It can be used as a home decor or as a showcase piece. Also use fabric glue instead of using pins to add safety.