
When I was studying in school (that was two decades ago), I remember doing a lot of craft works during the weekends and holidays. Not only me, my mom, my sisters, my friends, aunts, neighbors, everyone showed much interest towards hand made crafts. If someone does something new whether it is craft or just a recipe, it would immediately spread among the others like a forest fire. The next thing anyone would want to do is to rush to the local craft store to get the necessary items for that craft.
Those were the days when there was less TV, less/no trips to shopping malls, no Internet and lot of free time with lot of real friends to hang with. Weekend seemed to be very large enough to achieve whatever we plan during the week days. I’m not blaming our current schedule filled busy life, because I enjoy my life these days as much as I did it in the past. If you ask me, the one thing that I cannot leave behind is internet; you know what I mean!
Since everyone is so busy nowadays, there is no time to think about doing crafts at home. The only time we do craft is when our kids bring some school projects to do at home. If at all if we need anything to decorate our home, we go straight to some fancy shops; pick and buy one of the many beautiful things stacked up on their store rack. What an easy way to decorate!
Now back to my old story! One day I was thinking about the various craft projects that I did when I was young, which gave me an idea to re-create those things and post it here. So I visited the same craft store, where I used to buy things 20 years back! The shop was still there with little bit of added modern touch to it. Luckily I bought most the craft items that I needed to create my crafts including foam dress for dolls, home decors, wall hangings, flower vases etc. I’ll post these things one by one as soon as I complete them.
First one in this series is “Dressing up a doll using Foam Sheets”! Don’t be confused with the title. Below, I’ve included two images of a doll before and after adding the foam dress.

Doll bought from the Shop!

Doll with Foam Dress!
Now lets see how it is done in few easy steps:
Materials needed:
1. Doll, any size of your preference. (Here my doll’s height is approx. 10 inches.)
 2. Foam Sheets color of your choice.

Sponge Sheets or Foam Sheets
3. Chamki or colorful beads or any glittery things like stones for decorating the dress.

Chamki Beads Stones
4. Fabric Glue and pins.

Pins Glue Needle
5. Needle, Thread and Scissor.
Instructions:
1. Hold the doll in the upright position and measure the height from its hip to toe. Here in my case it is 5 inches.
2. Now take the foam sheet and unfold it. Cut a square with a diagonal measuring double the size the dolls hip – to – toe height. Here in this case, diagonal measures 10 inches since the hip -to – toe height is equal to 5 inches. (It is the hypotenuse if you fold the square in half diagonally, forming a right angled triangle.)

Squares
3. We need 4 of such foam squares for one doll.
4. Now fold the square in half diagonally and stitch the ends with a help of needle and thread like in the following figure.

Join the folded ends
5. Again fold it in half diagonally by holding the ends with stitch upside. Now put stitches at 3 more places, allowing a space of 1.5 inches between them by joining the inner two layers like I did in the figure. Leave the lower ends.

Stitches on the inner two layers
6. Repeat the same with the other 3 squares.
7. Now join all the four squares by holding and stitching together one outer layer from one square with one outer layer from other square. Now join these two with the third square and then these three with the last one. See the image below.

Joined Squares

8. holding the doll at the center of these squares, join the last 2 outer layers of 1st and 4th square hence forming a closed loop around the doll. Use a pin or string to attach these squares firmly onto the doll’s hip. Since we are going to add a tops to the doll, it won’t be seen outside.

Doll at the center of 4 squares
9. For the tops/shirt we need to measure height of the doll from its shoulder to hip. Also measure the shoulder to shoulder width approximately. Now cut a rectangle with its longest side equals twice the size of shoulder to hip height. In my case its 2×3 inches= 6 inches. Width = 2.5inches. No need to be accurate.

Measurements for Doll’s Top

Rectangle for making Tops
10. Fold the rectangle into half and cut a small circle/diamond shape at the center to form the doll’s neck and insert the doll’s head through this hole carefully.

Doll’s Neck

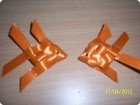
11. Cut small strip for the doll’s belt; holding the tops tightly, run this strip through the hip and pin it’s ends at the back to form a bow. Make sure that the tops hides the foam squares which were already attached to the hip.

Foam Belt

Tops with belt
12. Now for the finishing touch, pick some chamkis or beads or stones and glue them or pin them wherever the stitches are visible. Also decorate the tops with few beads by using your imagination. Below is the finished Doll.

Finished Doll
Note: This is not a toy for kids. It can be used as a home decor or as a showcase piece. Also use fabric glue instead of using pins to add safety.


Mam.
Pl advise where you purchased the items especially foam sheets since the ones in Adyar
are very thin. Any thickness should be mentioned
Hi Radhamani,
Thanks for visiting my blog!
I bought those sponge sheets from a small fancy store(Jeyalakshmi Stores) situated near to Shanmugam Road in Tambaram. Also found these foam sheets in a variety of colors in R.R Fancy stores, Paris Corner, Chennai. If you are living near T.Nagar, then you can ask for the sheets in Raja Thread Stores or in Pandian Thread Stores.
Even I used the thin foam sheets as I couldn’t find the thicker ones. Searched a quiet a lot of shops for the thicker ones and finally end up with what I have got!
Note: If you are having problem with the thin sheets, then try to paste two small sheets(for sample) using a craft glue or a fabric glue and try out.
Hope this helps!
Thanks,
Melinda.
Thanks for recollecting the memories from the past.