With an egg shell, you can create a lot of characters and make up your own story for your little ones in a very short time. An egg shell is a wonderful craft item and it’s unique shape and size helps one to create funny faces quickly just by drawing eyes, nose, mouth etc. This can be used to create things like a bird, a snowman, a penguin or a funny face easily. Hard to believe what I’m saying? Here I’m showing few things that I’ve made with an egg shell in a days time.


Want to try your hands on it? Okay! Let’s get started.
Materials Required:
1. Empty Egg shell, cleaned and dried (You may need more than one if you break it!)
2. Paints
3. Glue
4. Thin cardboard
5. Eye/ear droppers (for birds and penguin)

6. Feathers (for birds)

7. Eye/ ear dropper cap (for penguin)

8. Tape
9. Scissors
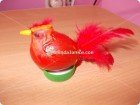
How to make a bird:
1. Take one large egg, empty it’s contents and wash it with mild soap water and dry it. In order to get a perfect egg shell, start piercing at the narrow end of an egg with a sharp tool or by using a screw driver. Make the hole as small as possible.

2. Cut out a small circle from a white paper big enough to cover the hole on the egg shell. Apply glue and paste it on the hole. This portion will be the bird’s tail when feathers are inserted.


3. Now paste the eye/ear dropper near the narrow end of the egg shell at the top. Already looking like a small bird doesn’t it?

4. Now it’s time to bring out the artist hidden deep inside you kids.(Just kidding!) . Paint the bird’s body, head, beak etc with your color of choice. Don’t forget to add eyes on both sides of the beak. Once painting is done, pierce tiny holes on the paper circle that you have pasted at the narrow end. Insert few feathers on these holes and spread these to form a nice tail around the edges.
Or you can add few more of these feathers on the bird’s body to get a different effect.

Place these birds inside a small basket and add it to your craft showcases.


How to make a snowman:
1. Do the above steps 1 and 2.
2. Take a thin cardboard and draw one big circle. Now draw one small circle inside this big one. Cut out the portion inside the small circle and the portion around the big one. You will get a circular disc like the one below.


3. Cut this disc at one edge going all the way to the center. Now roll it to form a cone with a hole at the center. Secure the ends with the help of a tape, both inside and outside of the cone. This will be the base where the snowman’s head will sit on it.


4. Apply glue at the top of this cone and place the narrow end of the egg on it. Press it gently and wait until it is completely attached to the base.

5. Paint the base with some earthly color. Now paste the eye/ear dropper cap around the center of the egg. Paint it with bright orange color.
Note: If you don’t get a cap, then you can make one yourself. Cut a semi-circle shape from a thin cardboard and roll it to form a cone. Secure the edges with the help of a tape.

Place two black dots to form eyes. Draw the mouth like you do it on a smiley.
For the snowman’s cap, cut a rectangular strip of thin cardboard. Roll it to form a cylinder. Secure the ends with the help of a tape. Now cut a small circle to close this cylinder at the top and paste it on top. Cut another big circle slightly bigger than the diameter of the cylinder and paste it at the bottom of the cylinder. Now your cap is ready. Paint the entire cap with black.

6. Now snowman is almost ready except for his favorite scarf. Cut a thin strip of cardboard and paint it with red and white alternatively. Outline these colors with black and paste it around the snowman’s neck i.e paste it in between the egg and cardboard base.

How to make a Penguin:
1. Follow the steps 1 to 2 from “how to make a bird”.
2. Place the egg vertically on a bottle cap with it’s narrow end at the top. Now paste the eye/ear dropper at the top like in the picture below.

3. Paint the beak yellow and the entire body black leaving an oval shape at the front. This oval represents the white belly part of the penguin. Stash the bright yellow just below its beak.

For wings, cut small “S” shaped strips from cardboard. Paint it black and paste it on both sides. Add white color wherever it is necessary. For penguin’s feet, cut 2 strips from thick cardboard and paste these at the bottom. Your penguin is ready.

How to make a girl face:
1. Follow the steps from 1 to 2 as usual.
2. Make a cylinder out of a thin cardboard and paste the egg shell on top of it with it’s narrow end going down in to the cylinder.
3. Paste a bunch of dark colored wool to form the girl’s hair. Leave few bangs at the front. Add lace for the dress. Draw a girl’s face on the egg shell. You are done.
Okay, I’m running short of egg shells now. Let me come up with more craft ideas using these egg shells very soon. 🙂

Very innovative and interesting…Keep rocking:)
if possible , fill inside of the Shell by plaster of paris to make it duriable and give support from inside.