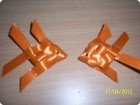
In this post, I’ll show you how you can make fish by making use of the same fish tape/mat tape which we used earlier to make a bird in our previous post. See below for a quick view of fish once when it is finished.

I’ll explain the process in few easy steps by adding more pictures since it is difficult to explain it in words at certain times.
Okay, lets start with the required materials.
Materials:
1. Fish Tape or Mat Tape

2. Stapler
3. Small Beads
4. Glue
Instructions:
1. Cut 2 strips of 35 cm length from the tape bundle. For making one fish, you need 2 strips of 35mm tape.

2. Make 2 loops one in each wire. Hold one loop in left hand and the other loop in the right hand.

3. Insert left hand loop into the right hand loop.

4. Holding it tightly, take the back end wire of the left hand loop over the right hand loop.


5. Turn this over. Other side looks just like the following.

6. Note there is a X shape in the middle. Now bring the bottom tape up and insert it into the X shape to form a loop like in the below picture.


7. Bring the tape on the left side and insert it into the loop you just made. Now tighten it.


8. Now slightly turn the above in clockwise direction like in the below picture.

9. Now you have four tapes in front of you. We will name these four tapes as 1,2,3 and 4 counting from left to right. Bring the 4th tape above the third tape.

10. Now bring the 1st tape behind both the 2nd and 4th tape. If you have done it correctly, yours will look like the one below.


11. Now bring the 1st tape to the front and fold it over 4th and 2nd tape.


12. Next take the 2nd tape and insert it into the 3rd tape, bring it outside. Tighten it.


13. Now turn this over. Backside will look like the one below.

Here also we have 4 tapes. We will name these tapes as top-left, bottom-left, bottom-right and top-right when we go from left to right direction.
14. Now fold bottom-right tape above bottom-left tape.


15. Take the bottom-left tape and insert as shown in figure below.


16. Tighten it. Almost done.

17. Turn it upside down and staple both the pair of tapes on each side. Trim the extra tape at the ends. These will form the fins for the fish on both the sides.


18. Cut two strips of tape for fish tail.

19. Insert one strip on each side at the end and fold it in half. Staple it in order to prevent it from coming out.


Do the same with the other strip. Trim the edges to resemble the tail of a fish.

20. Now for the eyes, apply glue and place two small beads on both the sides. That is all.

Note: If you don’t find any fish tape or mat tape, you can try this with any other tape like packing tape or any thin cardboard strips.
Fish made from thick textured paper is shown below.


beautiful!! also easy to follow the instructions. Very useful for those who are looking for holiday crafts ideas.
I used to do it when I was a child, but later forgot due to my academics and exams. Thanks for teaching and reminding this again
Thank u…you are welcome…
Thank you so much for a detailed instructions. Used to make them when I was in class 9th. forget the steps later. Thank you once again .
Thanks Prathima for such lovely comments!
Very good
thank you so much, Can i Know the details of the mat tape … What brand? where to buy it?