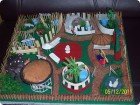
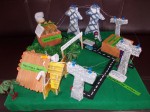
One day I was given a task of making a miniature Zoo for my daughter by her class teacher. I didn’t know where to start at first. All I know was that I would be placing few plastic animals here and there on a zoo like setup. I was little puzzled as I had not done this before and also I had only two days to finish it.
Somehow it came out nicely and got the appreciation from my daughter’s class teacher. I guess my little imagination and 12 hours of my hard work paid off.
Below is the picture of what I have created!


Below is the YouTube video of this miniature Zoo Model.
As you can see, I have used very simple materials which are readily available in any home to make this Zoo. Below is the list.
Materials used:
1. Cardboard
2. Thermocol
3. Color Papers
4. Crib Papers
5. Sand
6. Pins
7. Matchsticks
8. Toothpicks
9. Plastic Trees and Bushes
10. Plastic Animals
11. Clay
12. Few more plastic toys
13. Glue, Paints, Brush etc.
14. Ice cream sticks
Steps:
- First I created a base out of Thermocol and a thick cardboard.
- Then I covered that base with a green colored craft paper, which I bought from a stationery store. I chose green color so that it gave me a grass like feel to it.
- After that I pasted few red colored strips of paper to create various paths to roam around the Zoo. Also these red paper strips divided the entire base into different sections to keep each animal in a separate section. On those red strips, I applied glue and then sprayed sand carefully. Waited until it was dry enough to add other details.
- Slowly filled each partition with an animal and added a few more detail to it. Example: For Lion, I made a small den out of crib paper(which is used to make Xmas cribs) and inserted few Ice cream sticks around the den to create its cage.
- For Panda, I have added a small piece of cotton and few snow covered mountains to make it look like this Panda is in its natural habitat.
- I have also added few interesting details like sitting area with an umbrella, name boards, office/ticket counter, car parking etc.
- Finally added a compound for the Zoo using match box sticks.


Excellent work!! Keep rocking
Great Job! Very charming. My wife and I made one, too. Visit our website.
Very good model sir. Also sir can you tell me what did you use for the water.
Thanks for visiting my blog! To add the water feature, I have painted few small plastic cups/caps with blue and white paint and pasted them on the Zoo base.
Thanks!
Nice model 🙂
Nice work. My son was received same project. I will try to make the same.
Good Luck with your project!
verrrrrry nice. N thanks coz I m making same for my son.
Thanks Prajakta. You are very welcome!
Thanks a lot. Exactly what I am searching for..
Thanks Johnson; You are welcome!
Thanks and it is excellent. I am also received same project for my daughter
Thanks and good luck with your daughter’s project!
Oh water a lovely creation!…..it’s simply amazing!!!
Thanks Pearl!
Very nice even my son is having the same project thank u very much. I got an idea I will also try this
got a nice idea from your project. thank you so much
Thanks Sachin!
Excellent work, can you explain me how did you create a base? did you paste the cardboard on Thermocol and made it dry? Thanks for your help!
very nice model .good creativity
Nice dear plz tell me the size of cardboad
Hi Preeti,
Thanks for visiting…. Cardboard/Thermocol size is roughly of 2 feet X 2 feet.
excellent !!!
SUPER MODEL